
Painting kitchen cabinets is one of the easiest ways to update your kitchen without paying for a full remodel. But many homeowners run into common cabinet painting mistakes that lead to peeling paint, brush marks, or cabinets that wear out too quickly.
Most problems happen because of poor prep, using the wrong products, or rushing the process. With the right steps, you can get a smooth, long-lasting finish. If you want smooth, long-lasting results, it helps to know what mistakes to avoid before you start.
Mistake 1: Skipping Deep Cleaning Before Painting
Kitchen cabinets collect grease, dust, food bits, and cleaner residue over time. Paint will not stick well to dirty surfaces that’s why it’s a good idea to clean kitchen cabinets before painting them.
Before sanding or priming, clean every surface with a degreaser. You can use a cleaner/degreaser, dish soap, or mineral spirits based on the surface and product instructions. A spray bottle can help you reach tough, grimy spots.
Start at the top and work your way down. Then let the cabinets dry completely before moving to the next step. Use a soft scouring pad when needed so you do not scratch the surface.
Mistake 2: Not Removing Doors, Drawers, and Hardware
Painting around hinges and handles often leaves uneven edges, missed spots, and a rushed-looking finish. Remove cabinet doors, drawers, knobs, pulls, and hinges before painting.
Label everything as you go so reinstallation is easier later. Keep screws and hardware in labeled bags. Painting doors while they are lying flat can also help reduce drips and give you a cleaner finish.
Hardware matters, too. Old or mismatched hardware can make freshly painted cabinets look unfinished. If you plan to replace the hardware, take the old pieces with you so you can match the size and hole spacing.
Mistake 3: Skipping Sanding or Surface Scuffing
Sanding creates a surface that primer and paint can grip. Without sanding or scuffing, paint may chip or peel much sooner.
Glossy cabinets usually need sanding or deglossing before painting. Light sanding is enough for many cabinets, but laminate cabinets need extra prep because the surface is slick.
Even products labeled as "no sanding" still require cleaning and proper prep work. If you are wondering how to prep cabinets for painting, this step matters more than most homeowners realize.
Once the cabinets are clean, lightly sand the surface. Then wipe away all dust before priming.
Mistake 4: Using the Wrong Primer
Primer helps paint stick properly and prevents stains from bleeding through the finish. Skipping primer often leads to peeling, chipping, or uneven coverage.
Different cabinet materials need different primers. Bonding primer is especially important for glossy, laminate, or previously painted cabinets. Stained wood may need a primer that helps block tannins and discoloration.
The right primer creates a stronger base for kitchen cabinet painting and helps the finish last longer.
Mistake 5: Choosing the Wrong Paint for Cabinets
Standard wall paint is not designed for cabinets. Cabinets are high-touch surfaces that need paint that can handle moisture, grease, and repeated cleaning.
Cabinet, trim, or enamel-style paint is usually a better choice. Satin and semi-gloss finishes are popular because they are easier to clean and tend to hold up better over time.
Satin paint has a softer sheen and can help hide small imperfections. Semi-gloss paint is shinier and more moisture-resistant, making it a common choice for kitchen cabinets.
When choosing the best paint for kitchen cabinets, durability matters just as much as color. Do not skimp on paint quality. Choose a product designed for cabinets or high-use trim.
Mistake 6: Applying Coats Too Thick
Avoid the rush. Getting the job done fast does not work well when painting cabinets.
Heavy coats of paint often create drips, brush marks, and uneven texture. They can also lead to uneven coverage and longer drying times.
Thin coats dry more evenly and produce a smoother finish. Multiple thin coats work better than one thick coat. Follow the manufacturer’s recoat times and avoid rushing between layers.
Use painter’s tape where needed and protect nearby surfaces before you begin.
Mistake 7: Ignoring Drying and Curing Time
Dry paint is not the same as cured paint. Cabinets may feel dry within hours, but the finish can still be soft underneath.
Reinstalling doors or hardware too soon can leave dents, fingerprints, or marks in the finish. Always follow the recommended cure time on the paint label before heavy use or cleaning.
Air flow and ventilation can also help paint dry more evenly. Keep in mind that oil-based paints often take longer to dry than water-based products. Humidity and temperature can also slow the process.
Rushing this step can lead to touch-ups or a full redo, which takes more time in the end.
Mistake 8: Painting Over Damaged Old Paint
Do not paint over peeling, cracking, or bubbling paint. New paint will not fix a failing surface underneath.
Gently scrape off loose paint. Then sand damaged areas and repair dents or cracks before priming. Paint does not hide surface damage, and existing paint problems can show through the new finish if repairs are skipped.
Testing adhesion on previously painted cabinets can help you understand the surface condition before painting every cabinet.
Mistake 9: Forgetting About Cabinet Material
Cabinet material affects the prep process. Wood, laminate, MDF, veneer, and thermofoil cabinets all require different methods.
Laminate cabinets usually need bonding primer. Oak cabinets may still show wood grain after painting unless the grain is filled. Damaged thermofoil cabinets may not hold paint well at all.
Knowing your cabinet material helps you choose the right products and prep process. If your cabinets are not structurally sound, it may be better to replace them.
It can also help to understand the difference between cabinet painting and cabinet refinishing before choosing the best option.
Mistake 10: Expecting Paint to Hide Every Flaw
Paint can refresh cabinets, but it will not fix structural problems or major surface damage. Dents, scratches, and uneven surfaces may still show after painting.
A smooth finish takes patience, prep work, and quality tools. Large cabinet projects can become overwhelming for DIY homeowners, especially without professional equipment or experience.
If your cabinets need a lot of repair, or if you want a sprayed finish, hiring professional cabinet painters may be a better choice.
Quick Checklist to Avoid Cabinet Painting Mistakes
-
Clean and degrease cabinets.
-
Remove doors and hardware.
-
Sand or degloss glossy surfaces.
-
Use the right primer.
-
Choose cabinet-grade paint.
-
Apply thin coats.
-
Allow proper drying and curing time.
-
Test adhesion on laminate or previously painted cabinets.
Do these mistakes matter more in a humid climate like Mobile?
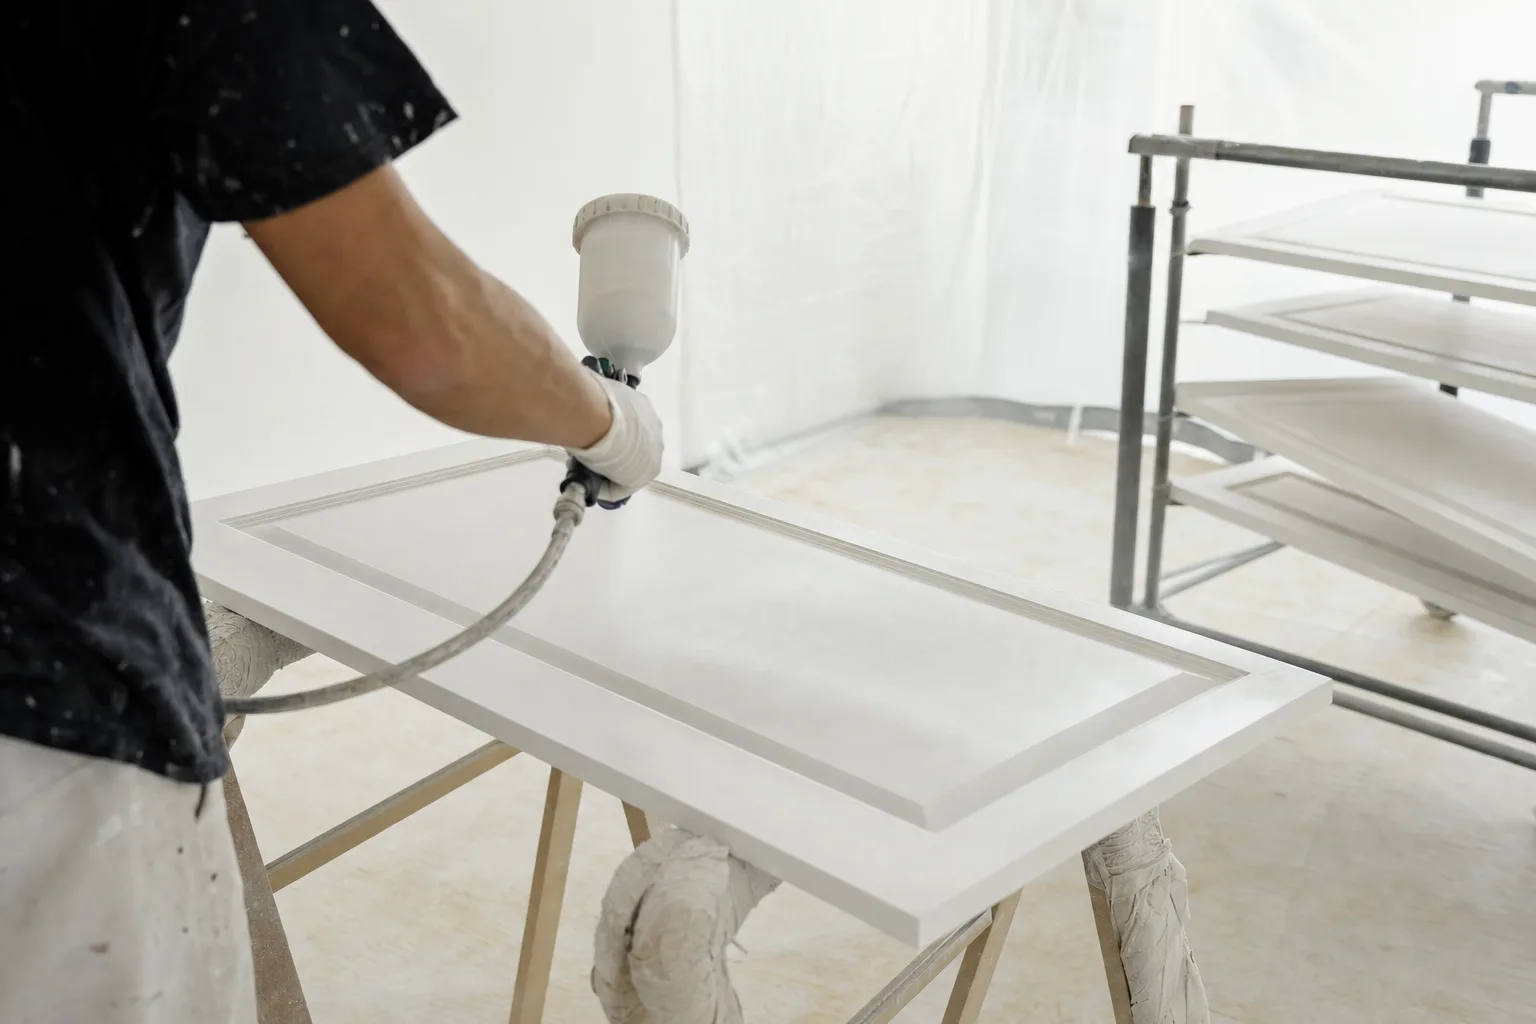
They do. Several of these mistakes — skipping the degrease, rushing the cure, painting over a slick or failing surface — bite harder along the Gulf Coast, where the humid Mobile Bay air keeps finishes tacky longer and gives grease and moisture more chance to undermine adhesion. We see it in kitchens all over Mobile, from older homes in Midtown and Spring Hill to newer builds out in West Mobile across Mobile County: the jobs that fail almost always skipped prep, not paint. It's a big part of why we finish doors and drawers in climate-controlled drying and preparation booths at our own facility rather than letting them cure in the open. If you'd rather skip the trial and error, our cabinet painting team handles the prep and spray for you.
Avoid Cabinet Painting Mistakes With Help From Pro 1 Painters
Most cabinet painting mistakes are preventable with proper prep, quality products, and patience. Taking the time to clean, sand, prime, and use the right paint can make a big difference in how long your finish holds up.
If you want a smoother finish and fewer headaches, working with experienced cabinet painters like Pro 1 Painters may be the better option. Painting kitchen cabinets is not always easy, so it is worth weighing the pros and cons of DIY before starting.
Pro 1 Painters helps homeowners update kitchens with professional cabinet painting services, attention to detail, and reliable results backed by strong customer reviews. Contact us for a free, no-obligation estimate.