
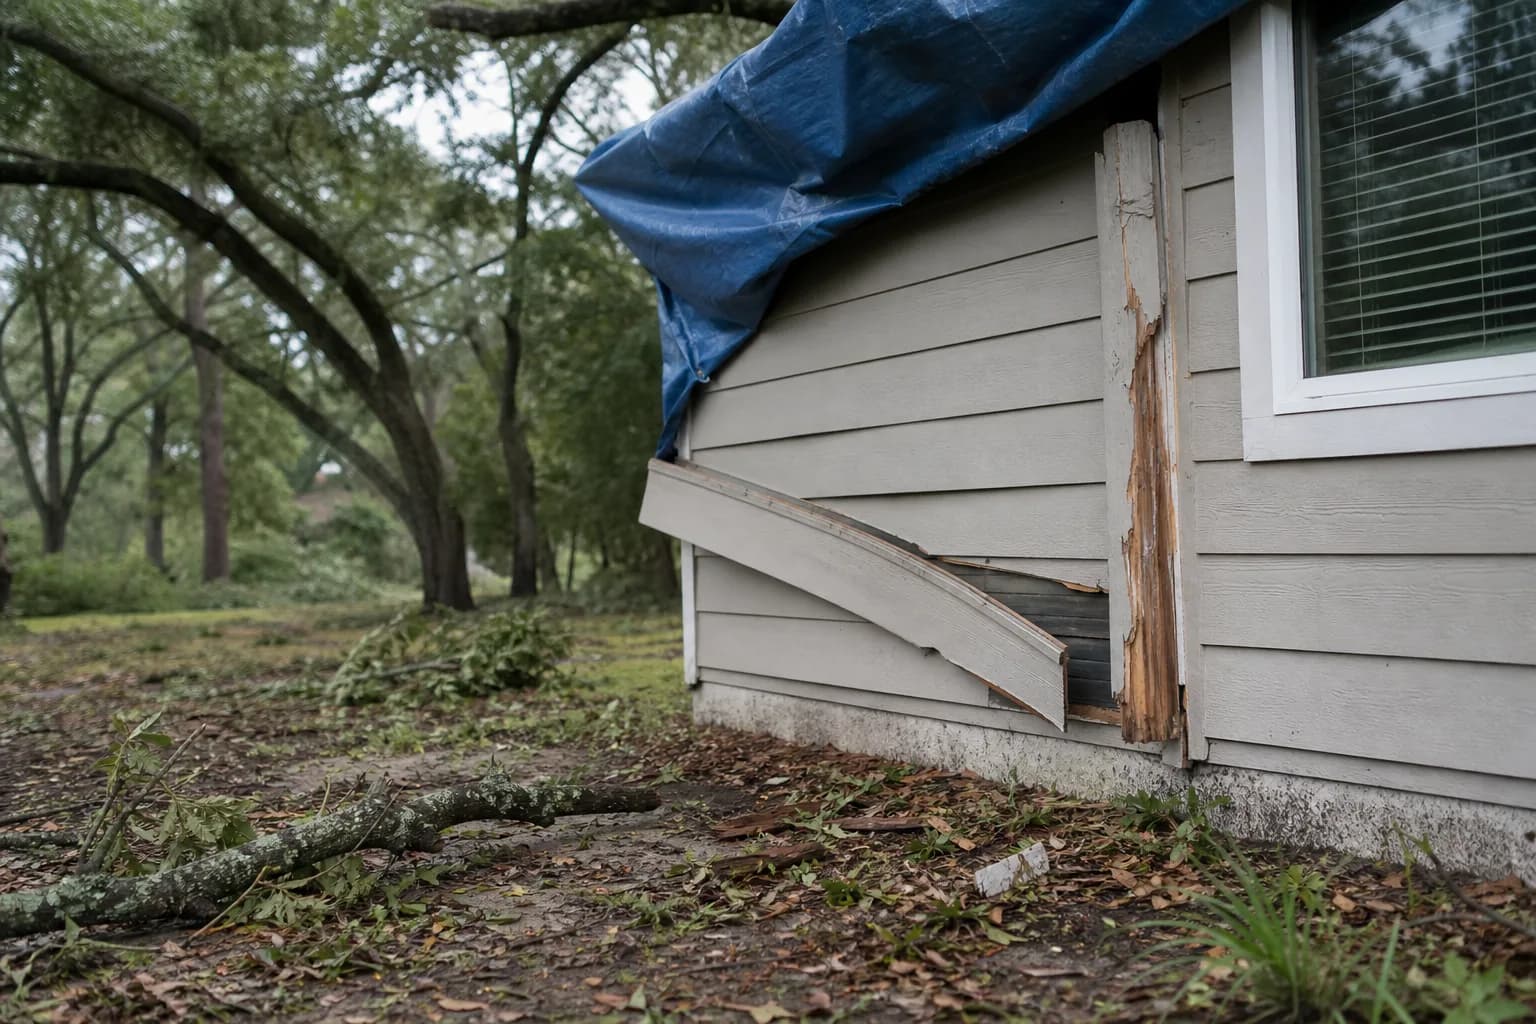
The storm's passed, the power's back, and now you're standing in the yard looking at your house. A strip of siding's hanging loose. There's a cracked trim board with bare wood showing. A water stain is bleeding down the wall under a window, and a branch took a chunk out of the corner. The instinct is to grab a ladder and start patching. Don't — not yet. What you do in the first day or two after a storm decides whether this is a clean repair or a mess you fight for years.
A post-storm exterior repaint isn't the same job as the work you do before a storm. Before the season, you're sealing gaps so water can't get in. After a storm, water already got in, wood is already damaged, and there's an insurance claim to think about. The order of operations is completely different, and getting it right is the difference between a fix that holds and a coat of paint hiding rot. Here's how we walk Gulf Coast homeowners through it.
First, document everything — before you clean up
Answer-first: photograph the damage before you touch a thing. The single most expensive mistake people make after a storm is cleaning up and patching before there's a record of what happened. Once you've tarped, swept, and nailed the siding back, the evidence an insurance adjuster needs is gone.
So before any cleanup, walk the whole house with your phone and shoot every damaged area twice — a wide shot showing where it is on the house, and a close shot showing the actual damage. Torn or missing siding, cracked and split trim, debris strikes, water stains, popped nails, anything pried loose. Get the broken branch on the ground and the dent it left. Then make only temporary, obviously-temporary repairs — tarp the open spots so more water can't get in — and leave the rest visible until you've documented it and, if you're filing a claim, an adjuster has seen it.
The post-storm sequence that actually holds
After a storm, the order matters more than anything. Skip a step or do them out of order — especially painting before the wood is dry — and the repair fails. Here's the sequence we follow.
1. Document before you touch anything
Photograph every damaged area — torn siding, cracked trim, water stains, debris strikes — wide and close, before any cleanup, so your insurance claim has a clear record of what the storm did.2. Make safe, temporary repairs
Tarp open spots and cover exposed wood to stop more water getting in, but keep the temporary fixes obviously temporary so the underlying damage is still visible for the adjuster.3. Let the wood dry out fully
Give soaked siding and trim time to dry to a sound moisture level before any priming or painting. Sealing paint over wet wood traps the moisture and guarantees the repair fails.4. Repair or replace the damaged wood
Replace cracked, split, or rotted boards, re-secure loosened siding, and treat any soft wood, so the surface under the paint is sound before a finish coat goes on.5. Prime, then repaint and blend
Spot-prime every bare and repaired area, then repaint — feathering the new paint into the surrounding finish so the repair disappears instead of leaving a patchwork of mismatched spots.
Notice the dry-out step sitting right in the middle. It's the one people want to skip because they're eager to make the house look whole again — and it's the one that wrecks the most post-storm repaints.
Why can't you repaint over wet or damaged wood?
Painting over storm-soaked wood is the most common reason a post-storm repaint peels within a season. Here's the mechanism: wind-driven rain forces water behind the finish and into the wood — the same path we trace in how wind-driven rain gets behind siding. If you prime and paint while that wood is still wet, you seal the moisture inside. It has nowhere to go, so the wood keeps swelling, and swollen wood pushes the new paint film off from the back. You end up repainting the same wall next year.
So saturated siding and trim have to dry to a sound moisture level first. There's no magic number of days — it depends on how soaked the wood got, the exposure, and how much sun and dry air it's had since. On the Gulf Coast, where the air itself is humid, that can take longer than people expect. A storm repair that waits for the wood is a repair that lasts; one that races the calendar is one you redo.
Fix the wood, don't just paint it
When wind and debris crack a trim board or pry siding loose, that's structure, not finish — and caulk and paint don't fix structure. After a storm, the wood comes first. We replace cracked, split, or impact-damaged boards, re-secure siding the wind worked loose, and treat any wood that got soft where water sat. Only once the surface is sound does primer go on.
That's why we treat carpentry as part of a post-storm repaint, not a separate job for later. Damage assessment, wood repair, priming, and refinishing stay in one accountable scope, so the wall is sound underneath — not a fresh coat stretched over damage. If your last repaint is already peeling in the spots the storm hit, that tells you water got into the wood, and a finish coat alone won't solve it.
Make the repair disappear
The last step is blending. A storm rarely damages a whole wall evenly — it takes out a section. So a good repair has to vanish into the surrounding paint, not sit there as an obvious patch. We spot-prime the repaired and bare areas, then feather the new paint into the existing finish so the eye can't find the seam.
There's an honest catch on older homes: siding that's been baking in Gulf Coast sun for years has faded, and matching one fresh patch to faded paint perfectly is hard. Sometimes the cleaner-looking result is to repaint a full wall or a whole elevation rather than leave a visible patch that's a shade off. When that's the case, we'll tell you — and we'll factor it into the estimate so the claim and the result line up. For the bigger picture on coastal exterior work, our exterior house painting guide for Mobile and Baldwin County walks through how a full exterior job is scoped and run.
The bottom line after the storm
A post-storm repaint comes down to a disciplined order: document the damage before you clean up, make only temporary safety repairs, let the wood dry, fix or replace the damaged wood, then prime, paint, and blend. Rush it — especially the dry-out — and you're repainting next year. Do it in order and your home comes back sound, not just covered up. When you're ready, book a free in-home estimate and we'll get on the calendar.
If a storm's left your home's exterior torn up, that's exactly what a free in-home estimate is for. We'll walk the perimeter, document what the storm did, and give you a clear written estimate of what it takes to repair and refinish it right — the kind an adjuster can work from. And if you're thinking ahead to the next season, our guide on protecting your home's paint before hurricane season covers the prep that keeps a storm from getting in next time. We've brought Gulf Coast homes back from a lot of storm seasons since 2013 — one accountable crew from your free estimate through the final inspection, backed by our 3-year workmanship warranty.